Snipping Tool:
The Snipping Tool is a built-in Windows utility for capturing screenshots and recording screen activity. It supports static image grabs and basic video recording with audio, making it ideal for quick documentation, tutorials, or troubleshooting.
1. Taking a screenshot of your windows screen:
How to Launch:
a. Press win-shift-S to open the snipping overlay directly.
b. Or search for Snipping Tool in the Start menu and open the app.
Eg:

Steps:
1. Open the snipping tool.
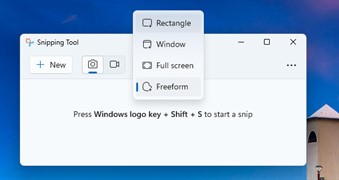
2. Choose a snip mode from the toolbar:
Capture Modes:

Mode               Description

Rectangular        Drag to select a rectangular area.

Freeform           Draw a custom shape around the area to capture.

Window             Click on a specific window to capture.

Fullscreen         Captures the entire screen.
Eg:
3. After Capture:
The image is copied to clipboard automatically.
A preview appears in the bottom-right corner—click to open in Snipping Tool editor.
You can annotate (with pen/highlighter using toolbar in editor), crop, or save the image (ctrl-S).
4. Save with ctrl-S or click the save icon.
2. Recording video of your windows screen:
Shortcut: Press win-shift-R to launch the Snipping Tool directly into recording mode.
Steps:
1. Open Snipping Tool.
2. Switch to video mode.
3. Click New to begin.
4. Select the area or window to record.
5. Click the Record button to start.
6. Use the Stop button when done
7. Save or share the MP4 file from the Videos folder
Eg:
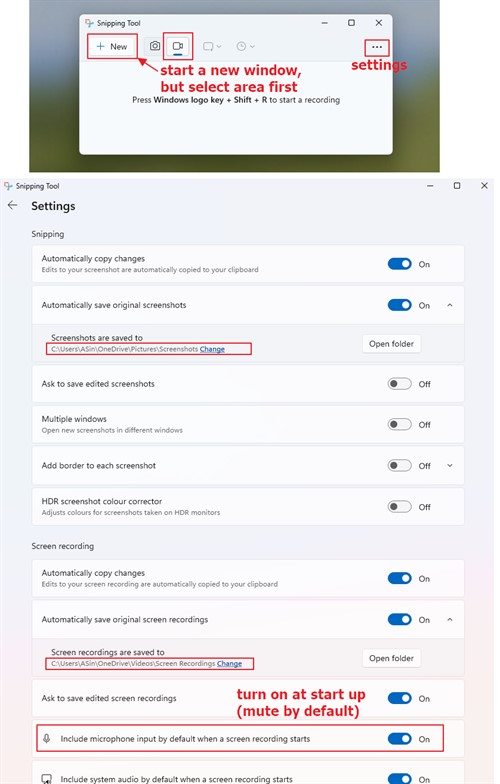
Audio Settings:
Toggle Record microphone to include voice narration in settings.
For more information, see here.